
OSCP - Developing a Methodology
by FalconSpy

Image owned and created by Offensive Security
I’ve been asked several times on Discord to create a post regarding my methodology and how to establish one. Mainly the individuals asking me this are new OSCP Students. As such this is primarily targeting the new OSCP students and for those genuinely interested as to my methodology.
Disclaimer: This is not the end all be all or the best methodology out there.
I will lay out some useful tools that are necessary for their specific service that are utilized to execute a methodology. The list may not be complete or contain all there is out in the wild. That being said, the list will contain the crucial and useful tools required for the OSCP Labs and Certification exam.
Selecting a Tool for Note Taking
There are a number of tools available for taking and storing notes. Note taking is essential for the OSCP lab and exam. Additionally, it’s a good habit to take notes especially if you are in the Red Teaming or Penetration Testing field.
CherryTree: I personally used CherryTree for the lab and exam. Another OSCP student had created a template for CherryTree which I copied to my github which can be found here: https://github.com/devzspy/oscp-certification/tree/master/Note%20Taking%20Tools/CherryTree%20Template

James Hall’s CherryTree Template
Dradis Framework: Dradis comes installed on Kali by default if I am not mistaken but I am not sure if the OffSec PWK Image has it or not. There is a Dradis OSCP template which can be acquired here https://dradisframework.com/academy/industry/compliance/oscp/.
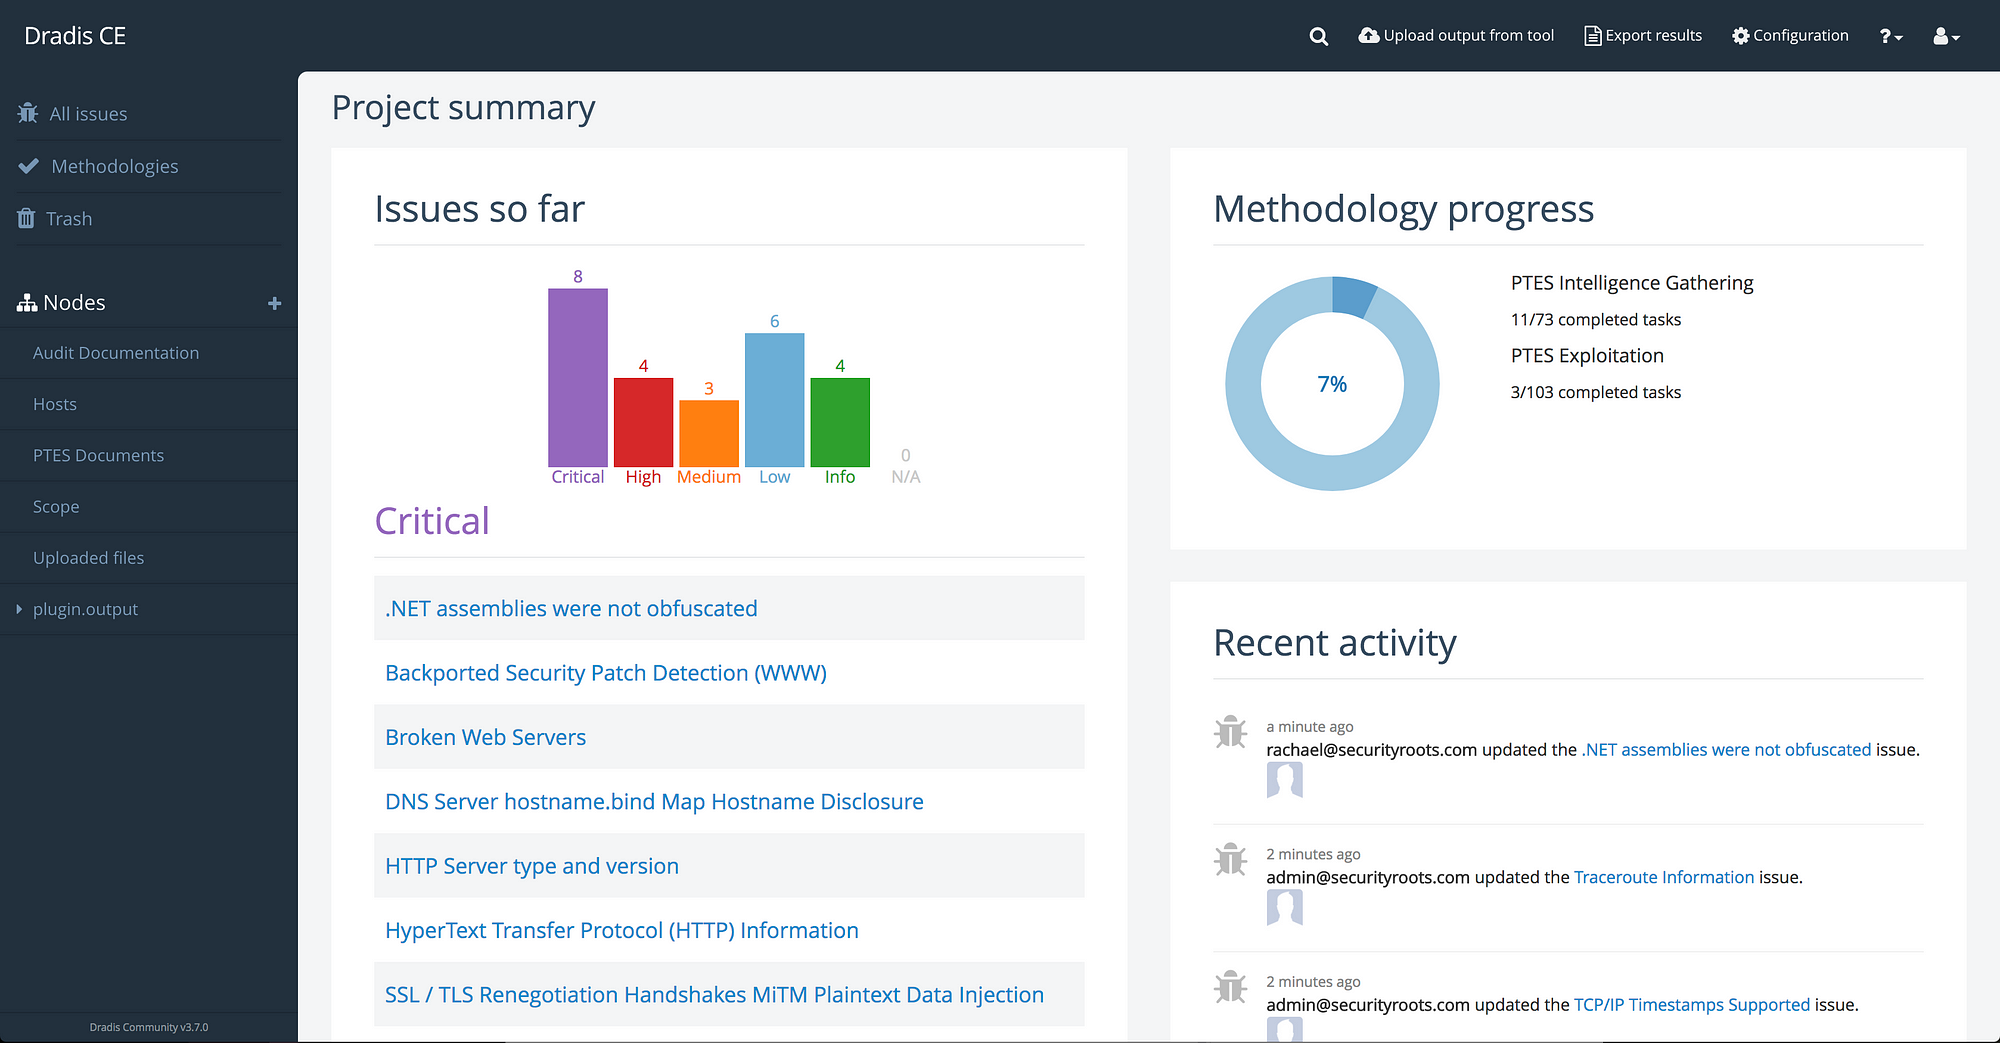
Dradis Framework
Penetration Testing Workshop: Somewhat similar to the Dradis Framework, this is primarily a website but have since offered paid users an offline version for note taking. The website for this is https://pentest.ws/ and the paid version is about $5/month charged quarterly. However, at the time of this post there is a special for $3.32/month charged quarterly. I used this framework for my time in the Virtual Hacking Labs environment

Penetration Testing Workshop Project Dashboard
SimplE RePort wrIting and COllaboration tool (Serpico): This isn’t a tool or framework I’ve used so very little experience with it. That being said, Serpico is a penetration testing report generation and collaboration tool. It was developed to cut down on the amount of time it takes to write a penetration testing report. You can get Serpico via https://github.com/SerpicoProject/Serpico
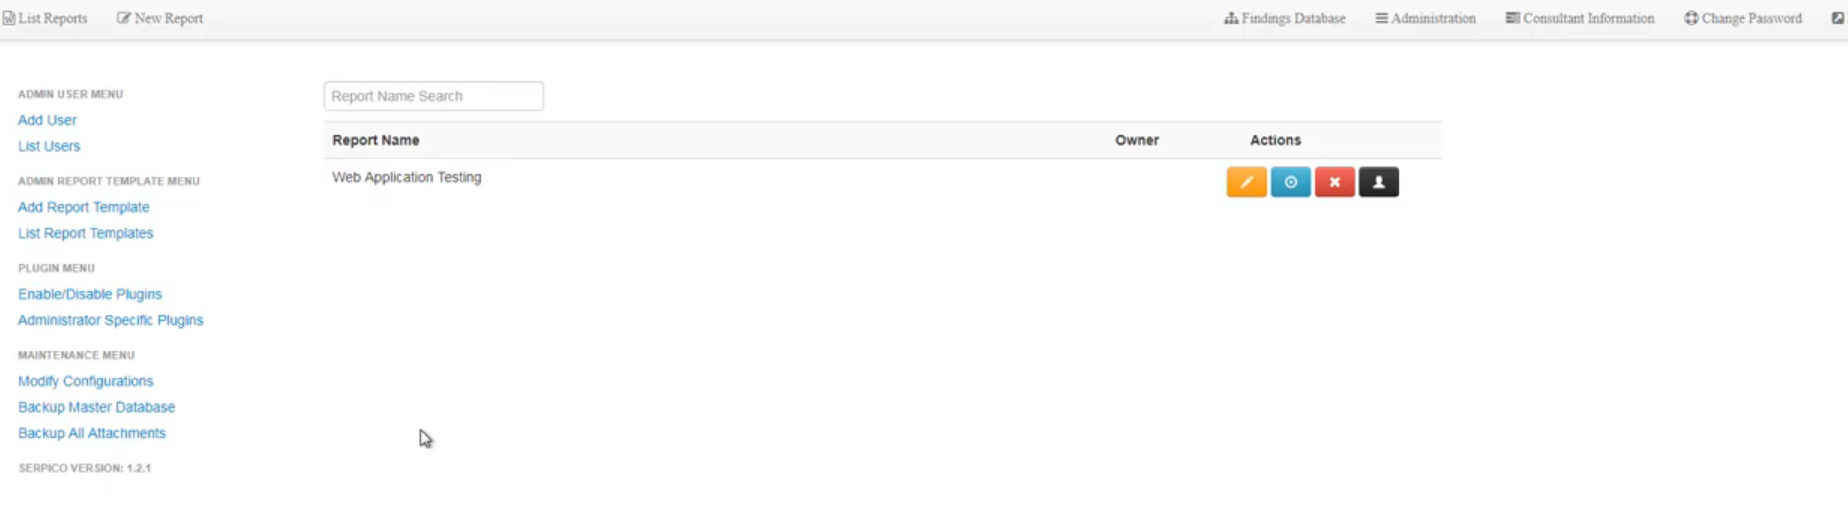
Serpico Dashboard
There are many others like KeepNote (no longer maintained by developer), OneNote, EverNote, Github Markdown, etc.
Feel free to pick whichever framework or note taking tool you feel best suites your needs.
Port & Service Scanning
Once you’ve determined your note taking system, the next step is to understand what kind of scans you will run.
The OSCP lab materials (video/PDF) contains a few exercises to get your feet dirty. OffSec doesn’t go a whole lot into the different tools at your disposal within Kali Linux. These tools are essential to performing different scans depending on what services and ports are open.
The first tool that should typically be ran when starting a new box for the OSCP Labs, exam, or in general would be nmap.
Nmap is a free and open-source network scanner created by Gordon Lyon. Nmap is used to discover hosts and services on a computer network by sending packets and analyzing the responses. Nmap provides a number of features for probing computer networks, including host discovery and service and operating system detection.
The materials OffSec provides for the lab and the exam has some basic nmap related exercises to get your feet dirty. It’s highly recommended to review the nmap man pages: https://linux.die.net/man/1/nmap or even find examples online.
Before I found some automated tools, I personally would run the same nmap scans against every machine in the labs. These commands are as follows:
nmap -sC -sV IP_ADDRESSnmap -sC -sV -p- IP_ADDRESSnmap -sU -sV --top-ports 20 IP_ADDRESSnmap --script vuln IP_ADDRESS
If you’d like to fully understand each command, feel free to pull up the man pages. For now, I will give a brief overview as to what each command does above:
nmap -sC -sV IP_ADDRESS
The above command effectively runs a scan with all default scripts and banner/service grabbing and runs against the top common ports
nmap -sC -sV -p- IP_ADDRESS
This command is very similar to the first one. Except now we are running a full port scan from port 1 through port 65535.
nmap -sU -sV --top-ports 20 IP_ADDRESS
The command above runs a UDP scan while displaying banner/service information against the top 20 common UDP ports.
nmap --script vuln IP_ADDRESS
The command above runs all of the Nmap Scripting Engine (NSE) scripts that are used for vulnerability detection.
There are a few tools available that were created by OSCP Students whom now have acquired their OSCP Certification. These tools effectively automate the nmap scanning process for you and kick off other scans based on what ports/services were found. These tools are as follows:
AutoRecon: This tools was developed by the Unofficial OffSec PWK Server’s very own Tib3rius. The name of the server has since changed to InfoSec Prep.
AutoRecon is a multi-threaded network reconnaissance tool which performs automated enumeration of services. It is intended as a time-saving tool for use in CTFs and other penetration testing environments (e.g. OSCP). It may also be useful in real-world engagements.
Example of AutoRecon running
I personally used this tool for the labs and the exam as it was created and released during my trials.
You can acquire this via https://github.com/Tib3rius/AutoRecon.
You may join the InfoSec Prep discord server via https://discord.gg/RRgKaep
nmapAutomator: This tool was developed by a member of the Hack The Box community that acquired their OSCP Certification.
The main goal for this script is to automate all of the process of recon/enumeration that is run every time, and instead focus our attention on real pen testing.
I used this tool a few times but I prefer AutoRecon as nmapAutomator is single threaded.
You can acquire this via https://github.com/21y4d/nmapAutomator
Web Related Reconnaissance
The typical ports for a web service is port 80, 443, 8080, 8081, 8443, and 3000. Please look up standard ports for each type of web service that may exist.
That being said, you may find a web service running on some of the non-typical ports. This is simply due to the web administrator or application developer picking a different port.
There are a plethora of tools used to help assist with web service related reconnaissance. This is not a complete list but ones I used and should suffice for the OSCP labs and exam.
Nikto: Nikto is a free software command-line vulnerability scanner that scans webservers for dangerous files/CGIs, outdated server software and other problems. It performs generic and server type specific checks.
This tool is built into Kali and included in the OffSec PWK Image. Please look up how to use this tool via https://tools.kali.org/information-gathering/nikto
dirb: DIRB is a Web Content Scanner. It looks for existing (and/or hidden) Web Objects. It basically works by launching a dictionary based attack against a web server and analyzing the response.
This tool is built into Kali and included in the OffSec PWK Image. Please look up how to use this tool via https://tools.kali.org/web-applications/dirb
I personally would stay away from this tool as I have found it not too helpful.
dirbuster: DirBuster is a multi threaded java application designed to brute force directories and files names on web/application servers. Often is the case now of what looks like a web server in a state of default installation is actually not, and has pages and applications hidden within. DirBuster attempts to find these. However tools of this nature are often as only good as the directory and file list they come with.
This tool is built into Kali and included in the OffSec PWK Image. Please look up how to use this tool via https://tools.kali.org/web-applications/dirbuster
I personally would not use this tool. It’s a massive resource hog as it uses Java. It has its uses but there are better tools.
gobuster: Gobuster is a tool used to brute-force:
- URIs (directories and files) in web sites.
- DNS subdomains (with wildcard support).
This tool is built into Kali and included in the OffSec PWK Image. Please look up how to use this tool via https://tools.kali.org/web-applications/gobuster
I have used this tool in place of dirb and dirbuster. However, I prefer the following tool below.
dirsearch: dirsearch is a simple command line tool designed to brute force directories and files in websites.
This tool is using Python 3 and is multi-threaded.
I personally use this tool and prefer it over dirb/dirbuster/gobuster. This tool is not built into Kali itself or the OffSec PWK Image.
You can acquire dirsearch via https://github.com/maurosoria/dirsearch
Please look at the help documentation or just use the recommended command from my Useful OSCP Notes & Command post.
wfuzz: Wfuzz is a tool designed for bruteforcing Web Applications, it can be used for finding resources not linked (directories, servlets, scripts, etc), bruteforce GET and POST parameters for checking different kind of injections (SQL, XSS, LDAP,etc), bruteforce Forms parameters (User/Password), Fuzzing,etc.
This tool is built into Kali and included in the OffSec PWK Image. Please look up how to use this tool via https://tools.kali.org/web-applications/wfuzz
Anonymous File System Access
There are a number of different services like FTP, NFS, and Samba that you may interact with on a system. Each of these services may allow anonymous read/write access.
If you see any of these services open and it allows anonymous access, prod it to see if there is any loot. You might just find something that is useful to you in gaining a shell or foothold on the target.
Maybe you can chain your anonymous read/write access to call a payload you’ve placed on the system.
General Rules
A general rule to follow at least when it comes to the lab or the exam is check anything that looks odd. For example, you see a web service running on port 9000 as an example. It might be your way into the system.
Set yourself a time limit when it comes to going down a rabbit hole. It goes without saying you have more time in the lab than the exam. Regardless, it’s best to establish a time limit that you are willing to chase the rabbit down said rabbit hole. Otherwise, you will waste time which is crucial on the exam.
Exploitation
The OffSec PDF and videos goes into a bit of detail about finding and using exploits.
searchsploit, a tool built into Kali, is your friend. Abuse it. For more information about searchsploit check out https://www.exploit-db.com/searchsploit
Use searchsploit, Exploit-DB, or even Google search with relevant terms to find a potential exploit. Use the information from the general rules, nmap scans, web scans, etc to help find a potential vulnerability. Then use the exploit to give yourself a shell.
Some of the exploits may work out of the box from searchsploit/Exploit-DB/where you found them. Some will require tweaking just a bit to make it work as expected. Make sure you read the code carefully and try to understand what it is doing. Do not just blindly run code as it might just delete everything from your system or make your machine become part of a botnet!
Post-Exploitation
Once you’ve obtained your unauthorized access to a machine via a shell, you will want to start gathering data.
This data should include information about the target:
- Operating System
- All users
- Users with Admin access
- Accessible Files/Folders
- Installed Applications/Binaries/Libraries
- Networking Settings
- Scheduled Tasks/Cron Jobs
- Running Processes/Services
All of this information can be useful to privilege escalation.
In addition to the above, you may want to try and ex-filtrate some useful information like passwords, zip files, configuration files, etc.
Obtaining loot may grant you information to other systems in the labs.
LinEnum: Scripted Local Linux Enumeration & Privilege Escalation Checks
This is a very useful shell script that was created to automate most of the tasks previously mentioned above. I would recommend running it with the “-t” flag for thorough mode as it will dump more information.
./LinEnum.sh -t
This does not come standard with Kali or the OffSec PWK Image. You can acquire LinEnum via https://github.com/rebootuser/LinEnum
LinPrivChecker: This script is intended to be executed locally on a Linux box to enumerate basic system info and search for common privilege escalation vectors such as world writable files, misconfigurations, clear-text passwords and applicable exploits.
Very similar to LinEnum above but will actually suggest exploits you may want to try in order to obtain root.
I used this tool but would advise not utilizing the suggester as it won’t be useful during the exam. It has a few uses during the labs.
This does not come standard with Kali or the OffSec PWK Image. You can acquire a Python 2 version via https://github.com/sleventyeleven/linuxprivchecker
There is an updated Python 3 version / shell script version available via https://github.com/linted/linuxprivchecker — I recommend using this as it has a server/client model.
Linux Smart Enumeration: This tool was created after the developer was inspired by LinEnum previously mentioned. This script is more up to date and just looks cleaner than LinEnum and LinPrivChecker.
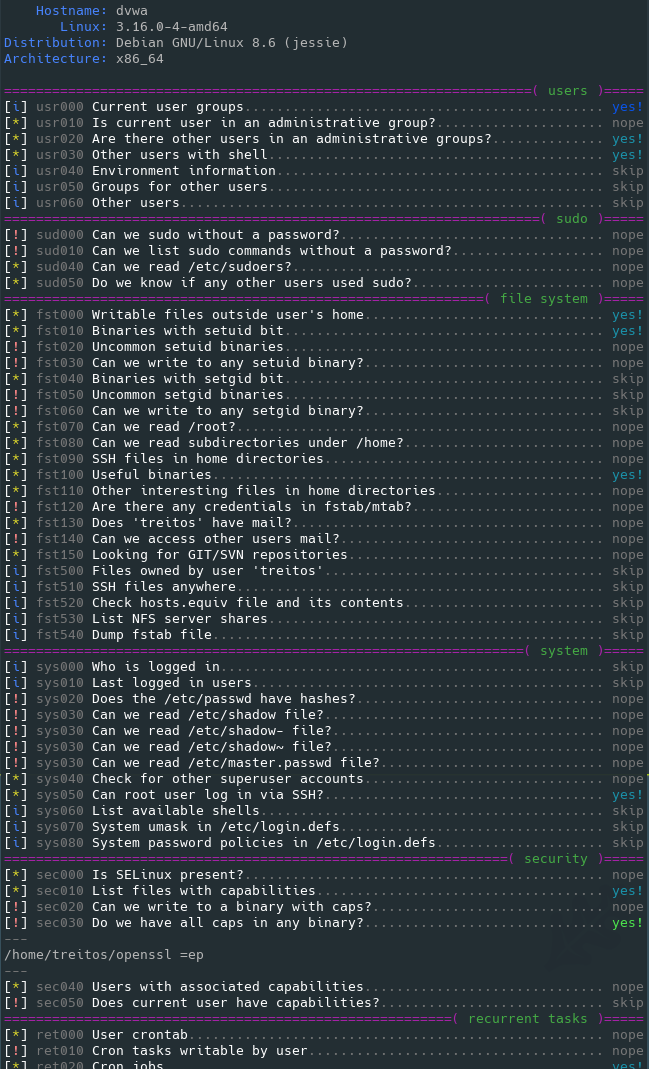
Linux Smart Enumeration
I personally did not use this script in the labs or the exam but I have used it for Hack The Box.
You can acquire this script via https://github.com/diego-treitos/linux-smart-enumeration
PowerUp: PowerUp aims to be a clearinghouse of common Windows privilege escalation vectors that rely on mis-configurations.
This script is useful but requires PowerShell. If you are to use this script I advise using a one-off PowerShell command. For example:
powershell.exe -exec bypass -Command “& {Import-Module .\PowerUp.ps1; Invoke-AllChecks}”
This does not come bundled with Kali. You can acquire the latest copy via https://github.com/PowerShellMafia/PowerSploit/tree/master/Privesc
Powerless: A Windows privilege escalation (enumeration) script designed with OSCP labs (i.e. legacy Windows machines without Powershell) in mind. The script represents a conglomeration of various privilege escalation checks, gathered from various sources, all done via native Windows binaries present in almost every version of Windows.
This script is recommend to be ran along side accesschk. You can acquire an OSCP friendly version of acceschk via https://web.archive.org/web/20080530012252/http://live.sysinternals.com/accesschk.exe
This script is not built into Kali. You can acquire Powerless via https://github.com/M4ximuss/Powerless
Privilege Escalation
Based on the data you’ve obtained from any of the various scripts previously mentioned, you may have found a method for privilege escalation. Whether it be your brute-forced some passwords, found a mis-configuration, abused file permissions etc.
Somethings to look for via the output of the scripts above:
- Process running as root/admin user
- Cracked password. Might just be the same for root/admin
- setuid binaries
- World Read/Write files
- Scheduled Tasks/Cronjobs that can be reconfigured
- User Paths
I would recommend reviewing Sagi Shahar’s Windows / Linux Local Privilege Escalation Workshop.
Sagi Shahar LPE WorkShop
There are scripts you can run on a Windows VM/Linux VM you created that will intentionally make it vulnerable to most of the branches in the above screenshot. There are also exercises and tutorials on YouTube for the Windows portion: https://www.youtube.com/playlist?list=PLjG9EfEtwbvIrGFTx4XctK8IxkUJkAEqP
You can review the workshop, obtain the scripts, and the exercises via https://github.com/sagishahar/lpeworkshop
LOOT ALL THE THINGS
Now that you hopefully have root or Administrative permissions on a machine, it’s suggested you dump any hashes for cracking.
You may also want to download any files you previously were unable to access due to your limited permissions.
Outro
This about sums up the gist of my methodology.
You should look to develop your own or modify the basics that I’ve laid out. A majority of a methodology is just the steps you take in order to attack your victim’s machine.
Others may have a similar methodology or it may be completely different. This methodology does hold fairly well when it comes to Capture The Flag (CTF) on Hack The Box (HTB). Although it will require some tweaking since CTFs are much different than how the OSCP is structured.
Feel free to find me on the InfoSec Prep discord server. Again the link to join is https://discord.gg/RRgKaep
tags: Pentesting - Methodology